This kit replaces existing Aqualumin lights and Aqua Lamp with our patented flat back Amoray Light. Amoray Light is turtle friendly and Ideal for: Pools, Ponds, Lakes, Fountains, Docks, Water Features, Streams, Underwater Accent Lighting, Ocean Salt Water Applications
Flat back design and flush wall mounting bracket make installation faster and easier. Easy installation using the existing niche to flush mount the Amoray 13 Color Show 12v LED Nicheless Light. Ideal for replacing existing Aqualumin Series lights with upgraded new 12v LED Technology.
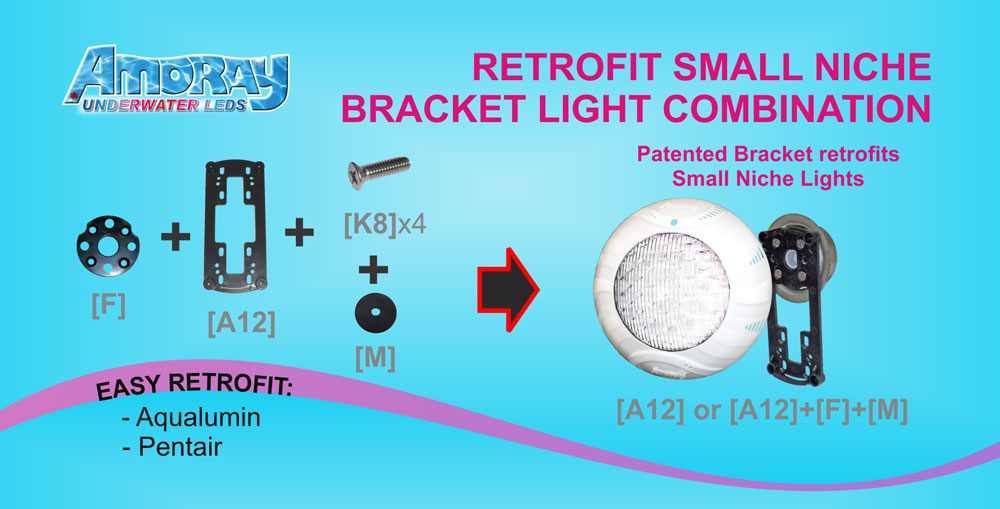
1. For small niche installations, remove existing light then attach the [A12] Universal Mounting Plate to the niche.
2.Optionally, the [F] Spacer Bracket can be used in conjunction with [A12] Universal Mounting Plate to provide a more precise fit. [F] Spacer
Bracket can be installed between niche and [A-12] Universal
Mounting Plate (Figure 1.) [M] Rubber Washers can be used to
adjust camber of light.
3.Wrap a length of the cord to a maximum of 2.4m (8ft) long on the back
of the light assembly. This extra cord allows for the light to be brought
up out of the pool for servicing.
4.Pull wire through the center of the niche inside the existing conduit.
Connect blue and red wires to the low voltage transformer at the
junction box. Leave communication wire (yellow-green stripe)
exposed.
5. To mount the light on the [A-12] bracket , use your fingers to pull
out bottom of [A-12] bracket 1” forward, then slide the tab near the
inside bottom of light into slot in bottom of the [A-12] Universal
Mounting Plate.
(Light must be in vertical position (set screw hole at top) to slip tab into slot.)
6. Before operating the light for more than 3 minutes, ensure the light is
completely submerged. To check for proper light operation, turn on the
main switch at the circuit breaker and use the ON/OFF buttons (1&2)
on the remote to turn light ON or OFF.
(Cycle ON OFFButtons to Sync Multiple Lights)
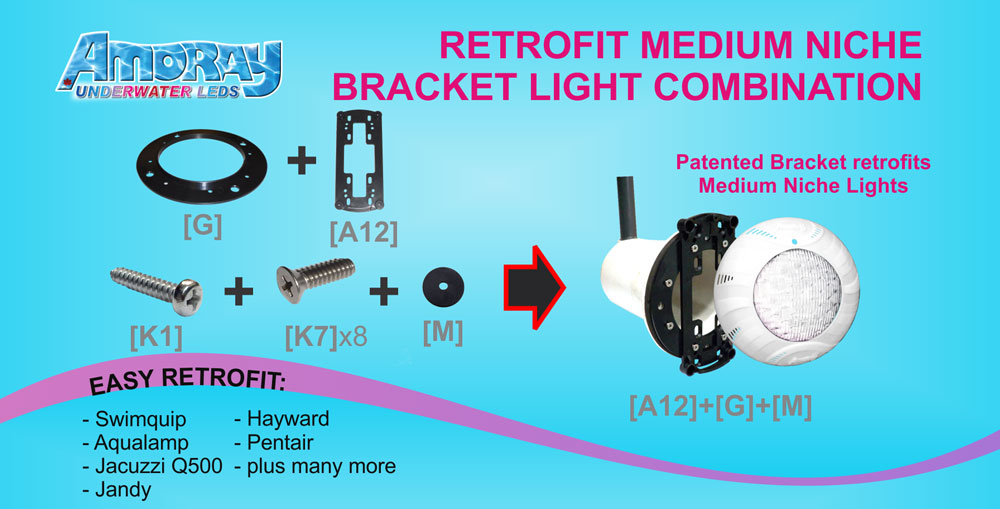
1. For medium niche (6”) installation, remove existing light and ring.
Fasten [G] Medium Retrofit Bracket to the existing niche using 4 x
[K7] screws on either side of [G] bracket only.
2.Fasten the [A-12] Universal Mounting Plate to the [G] Medium
Retrofit Bracket with the remaining 4 x [K7] screws.See Photo for
example of final configuration. [M] Rubber Washers can be used
to adjust camber of light.
3.Wrap a length of the cord to a maximum of 2.4m (8ft) long on the
back of the light assembly. This extra cord allows for the light to be
brought up out of the pool for servicing.
4.Pull wire to the outside-right of [A-12] Mounting Plate and through
the existing conduit. Connect blue and red wires to the low voltage
transformer at the junction box. Leave communication wire
(yellow-green stripe) exposed.
5.Slide the tab near the inside bottom of light into slot in bottom of
the [A-12] Universal Mounting Plate.
(Light must be in vertical position (set screw hole at top) to slip tab into slot.)
6. Before operating the light for more than 3 minutes, ensure the
Light is completely submerged. To check for proper light
operation, turn on the main switch at the circuit breaker and use
the ON/OFF buttons (1&2) on the remote to turn light ON or OFF.
(Cycle the ON OFF buttons to Sync multiple lights.)
Input: Safe Low Power AC 12V Light
Output: 54 watts; Power Cord: 3.7m
Corrosion Free Design
Best choice for both chlorine and salt water pools
Low voltage LED lights eliminates
the chance of electric shock

Easy for new installations and
simple to retrofit existing pools
Long lasting LEDs, Ultra Low Power and
Durable Construction means huge savings
13 Brilliant Color Combinations and remote control convenience


